ADA MED SUPPLY LIMITED
Phone:+86 13383897707
Tel:+86-0379-65160607
Email:sophia@adahealthy.com


Article tag: Gluteal injection model medical clinical model
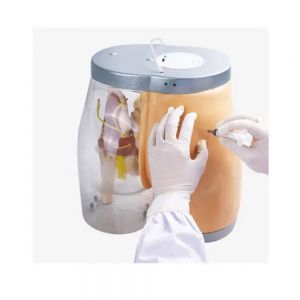
First of all, the buttock intramuscular injection medical teaching model provides a real and simulated anatomical structure, allowing learners to intuitively understand the location, distribution and layering of buttock muscles. By observing and operating the model, medical staff can have a deeper understanding of the anatomical structure of the buttock muscles, master the accurate injection point and depth, avoid damage to surrounding tissues, and ensure accurate drug delivery and therapeutic effect.
Secondly, the buttock intramuscular injection medical teaching model emphasizes cultivating the injection skills and operational standardization of medical staff. Through the operation of the model, learners can simulate the real injection process, practice correct injection techniques and angles, improve injection proficiency and safety, and ensure the effective delivery of drugs and the realization of therapeutic effects.
In addition, the hip intramuscular injection medical teaching model also focuses on cultivating the communication and patient care abilities of medical staff. In model practice, medical staff need to cooperate with the model to conduct simulated injections, cultivate the ability to build trust with patients, provide professional injection education and caring guidance, and ensure patient comfort and the realization of therapeutic effects.
In addition, the hip intramuscular injection medical teaching model also provides strong support for research and academic exchanges. Through the use of models, researchers can simulate injection experiments under different circumstances and study issues such as the permeability and efficacy of different drugs in buttock injections, providing scientific basis for clinical practice and the formulation of guidelines.

Buttock intramuscular injection is a common medical procedure. Here are some precautions:
1. Injection site selection: For buttock intramuscular injection, the gluteus maximus is often chosen as the injection site. When selecting the injection site, avoid redness, swelling, induration, inflammation, infection, scars, etc. At the same time, avoid the blood vessels and nerves in the buttocks to avoid damage.
2. Injection techniques: When injecting, attention should be paid to the use of aseptic procedures to ensure that the syringe and needle are clean and disinfected. When injecting, the patient must relax his muscles, fix the injection site, and quickly penetrate the muscle layer vertically, with the depth of the needle being 2/3 of the needle body. After the injection is completed, fix the needle plug, press the needle eye, quickly withdraw the needle, and press for a moment to reduce the risk of bleeding and drug extravasation.
3. Age consideration: For infants and young children under 2 years old, it is not advisable to choose gluteus maximus muscle injection, but gluteus medius and gluteus minimus injection, because the buttock muscles of infants and young children are poorly developed, and gluteus maximus muscle injection may damage the sciatic nerve. Danger.
4. Individual differences: Each person’s anatomical structure of the buttocks may be different. Therefore, individualized operations must be performed according to the patient’s specific conditions during injection to avoid damaging important structures.
